Making Your Original Souvenir at the Airport
Scented Bag, Washi Box, Doll, Fan…
In the middle of Narita Airport vibrant shopping arcade, there is a little gift store that gives travelers the opportunity to bring home a handmade souvenir. Kyoto Craft Mart specializes in stylish yet affordable “Made in Japan” trinkets. What sets this shop apart is that visitors can sit down and make a variety of small crafts, some requiring only about 20 minutes. Shop manager Teruno Fujii says that they enjoy offering this unique service at the airport which their flagship store in Kyoto has been conducting for many years. The crafts offered reflect the geisha culture which of course is an integral part of Kyoto traditions.
There are six crafts to choose from. Some like the cloisonné key holder, the scented bag and the spinning top require a level of dexterity while others like the washi box, the doll and the Japanese fan need painting finesse and a dash of creativity. I decided to make a Japanese fan which is often seen in maiko (young apprentice geisha) dances and the spinning top which is used when geisha entertain their guests.
The Japanese Fan
The Japanese folding fan is perhaps best known for its importance in the dances of the maiko. The most famous fan dance may be the Kamogawa Odori, an elaborate performance about the romantic triangle of a handsome fan maker, his lovely fiancee and a jealous snow goddess. Since the steps are slow, deliberate and very suggestive, the fan can accent sensuality and create drama by opening and closing. Because of its vibrant colors, the fan accentuates the elaborate kimono, hair styles and bold make-up of the dancers.
Besides its prominent role in maiko dancing, the fan also has a wide range of symbolic meaning in Japan. It represents friendship, respect and good wishes so it makes a very appropriate gift. Although fans were influenced by China, the folding style was invented in Japan between the 6th and 9th century. Historically, it played an integral role in the social activities of the ancient courts. At one point, the number of wood strips signified a person’s societal rank. For ornamental purposes, they are still used in the elaborate formal costumes of the Emperor and Empress. The fan also had practical purposes such as being used by shoguns to signal secret orders on battlefields and the metal-edged fan was a disguised weapon for ninja. It is still used a stage prop not only for dancers but kabuki (traditional Japanese theater) actors and rakugo comedians as well. On a popular level, fans are still very common for Japanese people to cool themselves with in the summer heat.
How to make the fan:
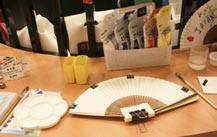
- The clerk will provide you with a plain, white paper fan which is not attached at the bottom so it becomes flat and easier to paint on. It is pinned on a large piece of white paper to ensure it does not move around.
- With a pencil, you draw the design you want on it. The shop has several examples for you to get inspirations from. They also have a book with drawings of flowers and other images to copy from.
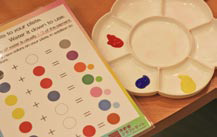
- Then you can begin water coloring with the palette they prepare.
- After the paint is dried, you can fold up the fan and hammer a metal peg to hold it together.
- Your fan can now be used to cool you down or be displayed as well.
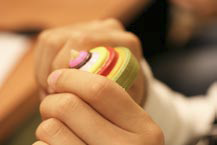
The Japanese Spinning Top
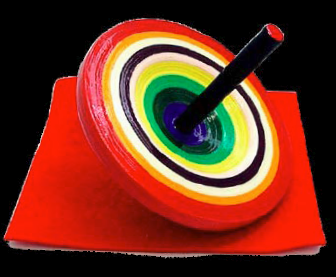
The Japanese spinning top “koma” also has a rich and long background. Children used to indulge themselves by spinning the colorful tops. Kyoto-based tops are traditionally made from wood, painted colorfully and varnished with a clear lacquer. Produced with fine craftsmanship, despite its ornamental nature, the koma must also spin evenly and for a long time. These types of “ornamental tops” (kazari koma) are sometimes given to a newborn baby boy on his first New Year celebration. The koma usually has a strong bamboo peg to symbolize the wish for the child to have internal strength. The practice of “spinning” can refer to money “going around” which indicate monetary luck for the upcoming year.
How to make the top:
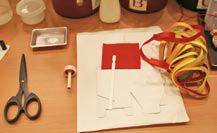
- The parts consist of a wooden peg to hold and spin the koma and lacquered paper already wrapped around the peg to create a solid core. There are also four strips of colored paper and a red felt cushion for displaying the koma.
- After placing about 1 to 2 cm of glue on the edge of the paper, you start wrapping the core with a paper strip the color of your choice. There are plenty of papers, so you can determine how much of each color to use.
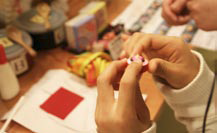
- When you want to change colors, you cut and glue the end of the paper strip. Then you start wrapping with the new colored paper. The key to making a successful koma depends on how tightly and straight you can wrap.
- When you have finished wrapping the core, push down on the core and slowly pull the sides up to expand the roll. How much vertical depth you want your koma to have is personal preference. The flatter it is, the easier it is to balance and spin.
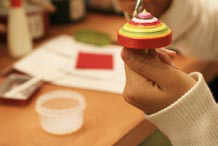
- Finally, you paint the entire koma with a coat of lacquer. Let dry for 20 minutes.
- You can now spin and play with it. (The balance will depend on how evenly and tightly you have wrapped it.) Display on its cushion when you’re not playing with it.


0件のコメント